
This guide will attempt to help you navigate around the Vanquish website. Starting with how to log in, editing or adding to your profile, and setting your time zone for the Events on this website. We will also show you how to sign up for events, changing your role, or even un-signing. And finally covering the forums and all you can do. So, let’s get started!
Logging In
On the top-right of the website you will notice 4 (four) icons as pictured below.

This is your Login. If you are signed out, your dropdown options will show “Login”, and “Apply”. If you are signed in, you will see dropdown options “Welcome, Dashboard, Edit Profile, Activity, and Logout”. This link has been included so at any time, if you need a refresh, it’s available.
Dashboard & Profile Details
The “Dashboard” tab is your Welcome screen. Links within will direct you to the “Profile Details” or simply just click the tab at the top.
In “Profile Details” you have the option to Change your Password or Edit your Profile which includes editing your profile picture, changing your email, Discord ID, and your Bio about yourself. When updating your photo, there is technically TWO places you should check; Here and “Edit Profile”.
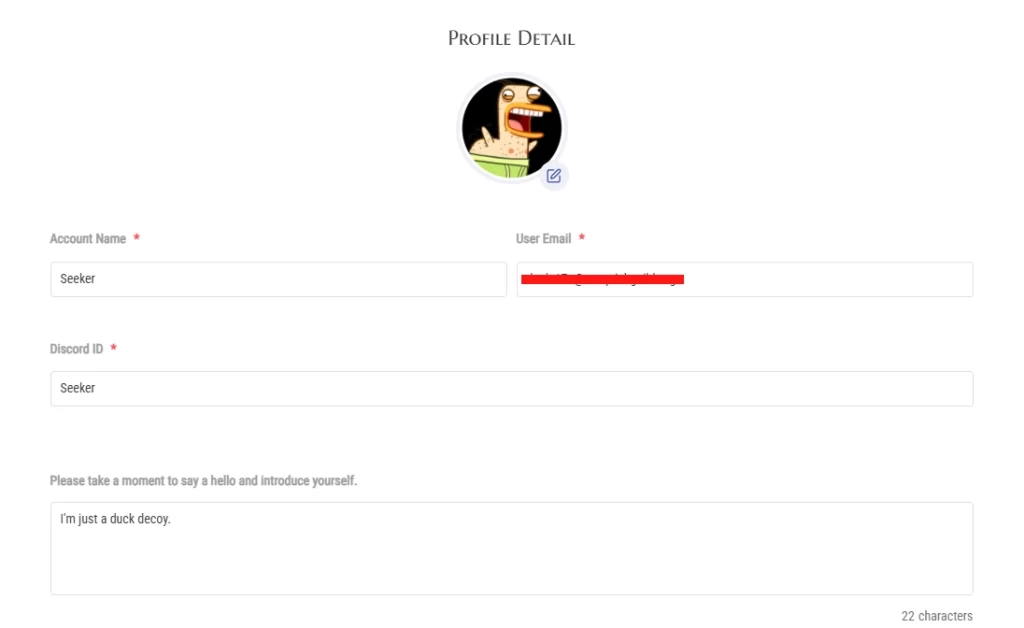
Note, you cannot change your Account Name. If you do change your ESO Account Name, please contact an officer for this change.
Subscriptions
Subscriptions may appear differently depending on the user. Early signups on this website, we followed the recommended method with a subscription model, and always being free. Later signups, we were able to remove that part and still allow signups for events.

We kept the tab in the profile for when we do open up our storefront. Using WooCommerce you can place, and check, your order status for that Vanquish Swag right here on this website.
Delete Account / Logout
“Delete Account” has a wonky refresh that only allows a couple seconds to actually enter your password to delete. It will work if so choose to do so and it’s on the list to investigate.
“Logout” doesn’t really need an explanation.
Edit Profile
The “Edit Profile” will take you to your Admin page. Here, you can change some of the profile information like you did earlier (just a different way of doing it) but more importantly, you can UPDATE your TIME ZONE.
On our Events Page, all the times listed are shown as EDT by default. To have the times on the calendar of events shown in YOUR time zone, you will want to scroll down a little on this page until you see this location:
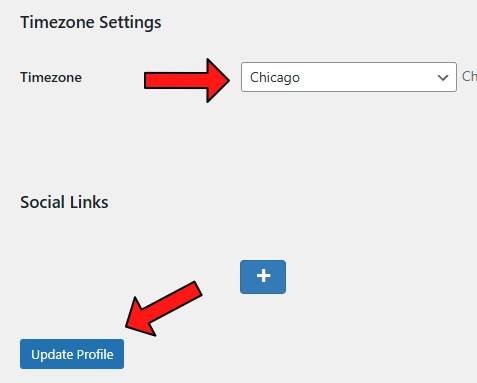
Select the cities around your location and be sure to hit “Update Profile” for the changes to go into effect. On the TOP LEFT, you can return to the website and verify. If the chosen city isn’t displaying correctly, it’s worth trying a different location in that zone.
Besides setting your time zone, we mentioned earlier about a second location to update your Profile Picture. On the top of your admin page, you will notice a tab “Extended Profile”. On the right of that page, if your Profile picture isn’t present or you are seeing a generic, you can update it here.
Once done, on the top-left of your screen is the home icon to bring you back to the website. Poof!
Activity
The “Activity” page will show all your activity across the website. From changing your profile picture to Replies, Comments, and Posts on the forums and website. This is a great placeholder to keep track of certain posts you are active in.
Signing Up for Events
Now that you are back at the website, we created a Practice Sign-Up event for you to know how to sign-up, and un-sign if something comes up. Go ahead and click this LINK to take you to the Practice Event. It will open in a different window so you might want to check to make sure you are signed in.
At the bottom you will notice the RSVP to sign up. This event was created as a basic trial. Click on “Going” and let’s get to your selection.
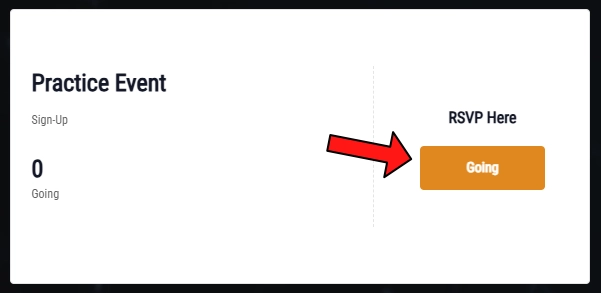
You will be presented with Role and Class selection. Your account name at top should be entered in by default. This account name is what the Event Organizer will send the invites too. The second line, your email, is for the RSVP register. ONLY you can see this as it will not be displayed anywhere else.
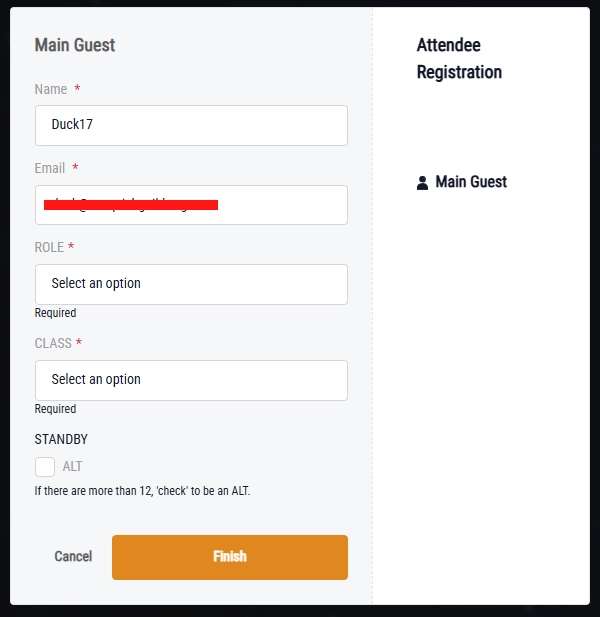
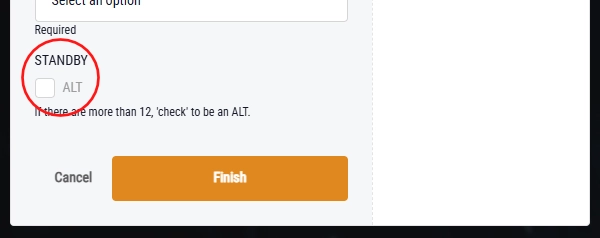
At the very bottom you will see a checkbox under ‘STANDBY’. What this means is if you are uncertain you can make it but wish to try, OR, you can make it but are happy to give up your spot for others.
Once you have made your selections, go ahead and click “Finish”.
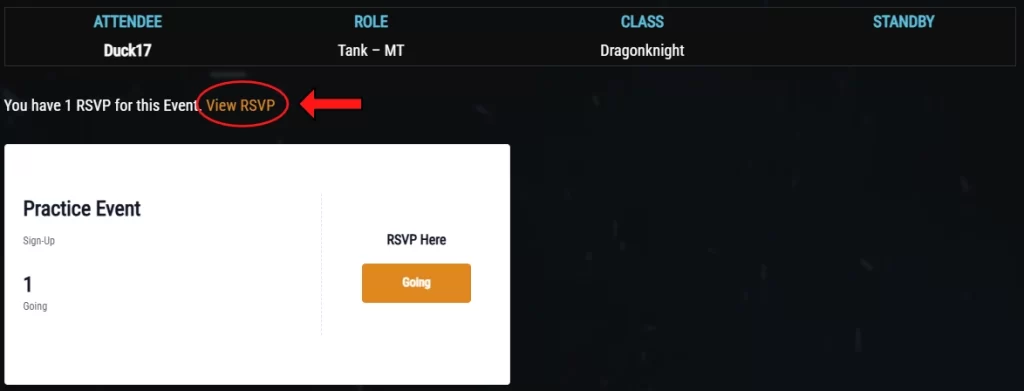
Congratulations! You just signed up for your first event. You should see an opportunity to print off a pdf or you can add it to your apple wallet for a reminder. With the event taking place in 2030 however, let’s just skip that.
Refreshing the screen, or clicking F5 shortcut, you will now see a visual confirmation that you have signed up.

Edit your Sign-Up or Un-Sign
Since there is life outside of ESO, things do come up and suddenly you’re no longer able to attend. So, how do you “un-sign” from an event? Do you see that “View RSVP”? Go ahead and click on it.
At this screen, you have a couple options. The first option is to un-sign from an event. All you need to do is change “Going” to “Not Going” with the dropdown option, and then “Update RSVP”.

After refreshing the page, or choosing “View Event” at the top, you will no longer see your name listed. It’s that simple.
But what if you just wish to CHANGE your ROLE. Everyone loves to tank. Right? But you only need a couple, not 12. So, you decided you wanted to be a DPS instead. Let’s go back to that “VIEW RSVP” button we talked about earlier.
Looking further down beyond the “going” or “not going”, you will see “+ View Attendee Info”. With a click, a dropdown menu will show with the selections you chose to sign up with.
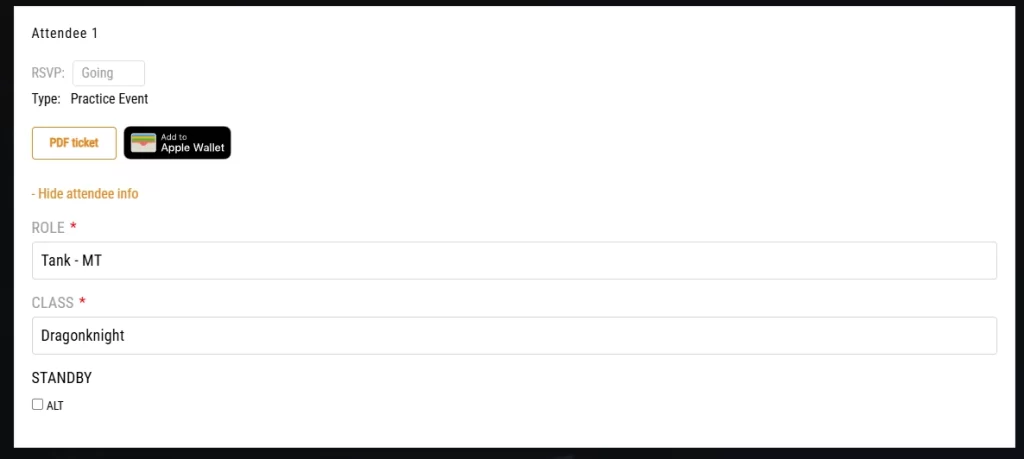
Change your Role, Class, or switch to Standby. You should be able to make these changes up until the start of the event. Once done, remember to “UPDATE RSVP” with the Orange Button at the bottom and refresh to see your changes.
Once you are all done testing the Sign-Up, please remember to un-sign from the event before leaving the area. Thank you!
Forums
Forums are a great way to communicate with your guildmates without getting lost in rows of text on discord. If you have questions, this is the preferred method to get an answer. Sure, discord is great especially if you get a response quickly. Just need to find… that answer… somewhere, providing they didn’t “reply” directly to you.
Seriously though, forums are a great tool and we will be enhancing the communication experience between our forums and discord. More to come on that. But, back to the forums.
On our forums, you will notice 2 (two) specific areas; Members Only and Public. Take a look at these two images.


PRIVATE FORUMS are resembled with an EYE icon to tell you, everything within is for Guild members only. We’re family right! Sometimes we don’t want the world to hear about our deranged Uncle Leo. Ya know? Those forums marked without the EYE icon, are open to the public so those that may have interest in Vanquish, can get a better idea of our community without learning about Uncle Leo.
The ORANGE (I almost wanted to highlight that in blue) quotation icon shows topics, replies, or forums that are UNREAD for you. If you wish to keep up and know what’s new, it’s a very simple visual confirmation.
Replying to a thread, or creating one, has all kinds of options including the ability to upload a file (up to 5 megs). Replying, or creating a topic, has your extended formatting options. By default, only half the bar is seen. Clicking on the Icon marked with the arrow below, will open up the extended part that allows font colors, indents, etc…

The forums have Notifications turned OFF by default. If you wish to be notified of updates, you should have that option when replying or creating a topic.
And there we have it! Sorry for the maybe-sorta-long explanation of our website but we hope it helps navigate you around.
See you in Tamriel!