

The Greymoor chapter of Elder Scrolls Online introduced the Antiquities system. This allowed for enhanced gameplay that called to the explorer/treasure hunter in all of us. It added lore for the history buffs, furniture for the interior Designers, mounts for those looking to add a little pizazz to our transportation needs, motif’s and costumes for the fashionistas, and mythic items for those of us who like to get the most out of character’s equipment. This guide will go over the basics of scrying and excavating, advanced skills, levelling tips, and how to find leads so that you can level to 9 (and get the fabulous shiny chests skill) and then onward to level 10 (and get the amazing furnishings and stained-glass windows) with as little frustration as possible.
Since this system is part of the Greymoor chapter, access to this DLC is required to take part in the Antiquities system. Since Leads can be obtained in all zones, including DLC zones, access to ESO+ is highly recommended.
In this guide we will cover:
WHERE TO GET THE QUEST
As this system came out with the Greymoor chapter of ESO, your quest giver for Antiquities can be found in the city of Solitude in Western Skyrim. You’ll find the Antiquarian’s Circle next to the Bards College. Once there, you’ll need to speak with Verita Numida, who will give you the Antiquarians Eye, the tool used to scry for the location of excavation spots and a short quest to get you started in the world of treasure hunting.

After you receive the quest from Verita, she will direct you to meet with Gabrielle Benele downstairs. This part of the quest is optional but is very helpful if you’ve never used the Antiquarians Eye or dug up an Antiquity before. If you’re already familiar with the scrying and excavating mini-games and are just here to get more insight into the system, feel free to skip the tutorial offered by Gabrielle. If you do take the quest from Gabrielle Benele, she will direct you out of the building to a small courtyard where you will practice your excavating skills. From this, you’ll get an antiquity to sell for 40 gold, and some bonus items, like a small amount of gold.
LEADS
Before we get into Scrying and Excavating, let’s talk about Leads. Leads are what you need to begin digging up any objects. Some leads come automatically within each zone you find yourself in, others are granted as rewards from fighting specific mobs, looted from treasure chests, as drops from resource gathering, or purchasing from merchants. You can get Leads of any quality, regardless of your level in the Antiquities system, but you will not be able to use them until you have reached the correct level of Scrying and have put skill points into ranking up Antiquarian’s Insight (see below for an explanation of the skills in the Scrying and Excavating skill line).
Luckily, leads are account bound, rather than character bound. If you have decided that you only want to level one character through the Antiquities system, you don’t have to worry about getting a lead on a character that isn’t able to Scry for it. The lead will be available to all of your characters once obtained.
Once you obtain a lead, you will be able to find those leads in your Quest Journal under the Antiquities tab.
GREENS, BLUES, PURPLES, GOLDS, and ORANGES
GREEN leads (Simple)
These are the simplest to scry for, and to excavate. Green leads are available at Scrying Rank 1. You will have a free green lead available to you in every zone you enter. These leads will typically grant you a low value item that can be sold to merchants. Green leads can also lead to motifs, such as Ancient Orc and Ancient Elf. These motifs can be collected, traded, or sold to other players. Lastly, many blue leads become immediately available after you have successfully excavated a green lead.
BLUE leads (Intermediate)
After you have reached Rank 3 in Scrying you can spend a skill point to raise Antiquarian Insight to Rank II. This allows you to scry for, and excavate, Blue leads. The Scrying and Excavating mini-games get a little more difficult here but do grant a little more Antiquities XP. You can find more of the motif chapters here as well as “treasure” objects that can be sold to merchants for more than their green lead counterparts.
PURPLE leads (Advanced)
Once you have reached Scrying Level 5 you can spend another skill point to reach Antiquarian Insight Rank III. This will allow you to scry for and to excavate purple leads. Purple leads are usually furniture and housing focused, although you may get a lead for excavating siege equipment for Cyrodill. The mini-games continue to get more challenging but the resulting Antiquities experience is also higher.
GOLD leads (Master)
At Scrying rank 7 you may spend a skill point to increase Antiquarian Insight to Rank IV, allowing you to scry for and excavate gold leads. This is the stage where lots of players stop worrying about levelling the Antiquity related skills as this is where you can scry for and excavate parts to the parts that make up the mythic items, such as Malacath’s Band of Brutality, or the Pale Ring.
ORANGE leads (Ultimate)
At Scrying rank 10 you can spend a skill point to max out Antiquarian Insight. Ultimate difficulty leads grant you access to excavating rare furniture items. They are the most difficult to scry for and excavate but grant the most Antiquities experience.
LEAD TYPES
To find the exact location of many of the leads below, see the Helpful Links section at the end of this guide. Besides the free Green, Blue, and Purple leads you get in each zone just for having the Antiquities Skill Line, Leads will drop from the following:
- Merchants – If you have the Pathfinder Achievement for a zone, you should be able to purchase a Green Lead for 1000g.
- Treasure Maps – Treasure chests obtained from Treasure maps may sometimes drop a Motif Lead.
- Thieves Troves and Safeboxes – Chance for a Purple or better Lead.
- Public Dungeon Bosses – Chance for Purple or better Lead.
- Random Mobs – chance for random Leads. Some of the Mythic leads are found on Specific Mobs.
- Psijic Portals – chance for random Leads
- Fishing – chance for specific Leads
- Specific Delve Bosses – chance for specific Leads
- Specific Rare NPCs – chance for specific Leads
- Specific Bosses – Some of the Leads for the Mythic Items are dropped from specific World Bosses.
- Raw Material Nodes in Cold Harbor – Chance for Gold Lead
LEAD EXPIRATION
Leads expire 30 days after you obtain them. That means, if you don’t successfully scry for, and excavate, the lead within the 30 day limit you will need to get the lead again by whatever means you obtained it to begin with. Those leads with expiration are those that you have not yet dug up or have a history of digging up. We have noticed that after you have successfully excavated the lead, once acquiring the same lead again, it will not have an expiration and always remain at 30 days.
SKILLS
Before we get into the mini-games we should first talk about the skills that you will be using in those mini-games. You will find the skills relating to the Antiquities system under World – Excavation and Scrying.
EXCAVATION
There are 7 Passive Abilities in the Excavation Skill line. All but the last of the skills in this line are used to make excavating easier. You will need 14 skill points to max out all of the passives in this line. The usage of the skills will be discussed later in the Excavating section of this guide. For now, here is a brief description of each.
| Name | Rank | Description | Excavation Lvl. |
|---|---|---|---|
 Hand Brush |
I | Removes a single layer of dirt or rock from a 1x1 area and generates 1 Intuition. | 1 |
| II |
Removes a single layer of dirt or rock from a 1x1 area and generates 1 Intuition.
New effect: Intuition meter doubles from 2 to 4. |
6 | |
 Augur |
I | Indicates how near the Antiquity is to the selected location. Can only be used a limited number of times, based on the Antiquity's Difficulty. Cannot detect Bonus Loot. Using Augur does not consume a turn. | 1 |
| II |
Indicates how near the Antiquity is to the selected location in the dig site. Can only be used a limited number of times, based on the Antiquity's Difficulty. Cannot detect Bonus Loot. Using Augur does not consume a turn. New effect: The effective depth and accuracy of Augur are both enhanced. |
5 | |
 Trowel |
I | Removes 3 layers of dirt or rock from a 1x1 area. Costs 2 Intuition (gained from the Hand Brush skill) to use. | 2 |
| II |
Removes 3 layers of dirt or rock from a 1x1 area. Costs 2 Intuition (gained from the Hand Brush skill) to use.
New Effect: Can safely trigger Fissures to create explosive chain reactions. |
7 | |
 Keen Eye: Dig Sites |
I | Antiquity Dig Sites will be easier to see when you are 20 meters or closer. | 2 |
| II | Antiquity Dig Sites will be easier to see when you are 30 meters or closer. | 4 | |
 Excavator's Reserves |
I | Increases the number of turns you have available when excavating a dig site. | 3 |
| II | Further increases the number of turns you have available when excavating a dig site. | 10 | |
 Heavy Shovel |
I | Removes a full layer of dirt and rocks within a 3x3 area of dirt or rock. Requires 4 Intuition to use. The shovel only affects a single contiguous height of dirt and rocks. | 4 |
| II |
Removes a full layer of dirt and rocks within a 3x3 area of dirt or rock. Requires 4 Intuition to use. The shovel only affects a single contiguous height of dirt and rocks.
New Effect: Has a chance to consume no Intuition |
8 | |
|
Keen Eye: Treasure Chests |
I | Treasure Chests in the world will be easier to see when you are 20 meters or closer. (Shiny Chests) | 7 |
| II | Treasure Chests in the world will be easier to see when you are 30 meters or closer. (Shiny Chests) | 9 |
SCRYING
| Name | Rank | Description | Excavation Lvl. |
|---|---|---|---|
 Scry |
I | Adds the selected contiguous group of facets to your area of control. Consumes 1 turn. | 1 |
 Antiquarian Insight |
I | Allows you to scry for antiquities of up to Simple difficulty. | 1 |
| II | Allows you to scry for antiquities of up to Intermediate difficulty. | 3 | |
| III | Allows you to scry for antiquities of up to Advanced difficulty. | 5 | |
| IV | Allows you to scry for antiquities of up to Master difficulty. | 7 | |
| V | Allows you to scry for antiquities of up to Ultimate difficulty. | 10 | |
 Coalescence |
I | Grants you an additional turn of Scrying. | 2 |
| II | Grants you two additional turns of Scrying. | 5 | |
 Future Focus |
I | Grants you an additional Magicka Charge for use in Scrying. | 4 |
| II | Grants you two additional Magicka Charges for use in Scrying | 8 | |
 Dilation |
I | Claim all facets of the selected type that touch your area of control, as well as matching facets directly adjacent. Consumes 1 Magicka Charge | 4 |
| II |
Claim all facets of the selected type that touch your area of control, as well as matching facets directly adjacent. Consumes 1 Magicka Charge.
New Effect: Dilation now claims All contiguous facets of the same type. |
8 | |
 Farsight |
I | Claim a line of 4 facets, stretching out from your area of control. Consumes 1 Magicka Charge. | 6 |
| II |
Claim a line of facets, stretching out from your area of control. Consumes 1 Magicka Charge.
New Effect: Range increased from 4 facets to 6. |
9 | |
 Preemptive Power |
I | Start each Scrying attempt with an additional row of facets already claimed. | 9 |
SCRYING MINI-GAME
Scrying is the first mini-game related to Antiquities. It shows you where in the zone you are going to find your dig site.
The first thing you will do is go to your Quest Journal and find the Antiquities tab.

The first option, labeled Scryable, will show you the items you can scry for in your current zone, and all active leads. To scry a particular lead, you must first be in the zone that the lead is in.
You click Current Zone, then double click on the lead you wish to Scry. That will bring up the mini-game. How difficult the Scrying mini-game is depends on the difficulty of the lead. The higher you go through the lead levels, the more facets there are and the more different types of tiles you will find.
THE ANTIQUARIAN’S EYE

You have a certain number of turns in which to connect a line of tiles to the Foci. The more Foci you are able to connect to the starting spot at the bottom by the time your turns are up, the fewer dig sites will be revealed, narrowing down your search areas. If you manage to connect all 6 Foci, only the dig site that contains the antiquity will show on your map.
If you don’t connect them all, you can try to scry again to see if you can improve on your last performance. It is not absolutely essential to get a perfect scrying attempt though, it just makes everything more efficient. If you have more than 1 dig site area shown on your map, just go to the closest one, find the actual dig site mound and click on it. If you are in the right area, it will take you to the Excavation mini-game. If you are not in the right area, the dig site and the dig site area will disappear from your map. Just head to the next dig site zone until you find the correct one.
ADVANCED SCRYING TIPS and TECHNIQUES
You have a certain number of turns, which can be increased with skill points, in the Scrying mini-game. On Green and Blue leads things are fairly easy, but the higher you go, the more difficult it is. That is where the Skills available under the Scrying Skill Line are beneficial.
Arguably, the most beneficial tool available to you for trying to connect the largest number of tiles is Coalescence. It will change a hexagonal set of tiles to whatever the tile in the center of the hexagon is. Dilation and Farsite are also helpful for claiming large swaths of tiles, but they are not quite as useful as Coalescence, so if you’re trying to save a few skill points on the entire antiquities line, you can save 4 by not taking Dilation and Farsite or the morphs.

Using a Magicka skill (Coalescence, Dilation or Farsite) does not use up an available Scyring turn, but it does use a magicka charge. Connecting tiles without using a Magicka skill uses a Scrying turn but will replenish your Magicka charges. The Scrying mini-game ends when you either run out of turns or have connected all 6 Foci.
EXCAVATING

Once you have revealed the location of the Dig Sites, it is on to the second mini-game of the Antiquities system: Excavating. If you managed to connect all of the Foci in the Scrying mini-game, then you will only see 1 Dig Site area on your map (it will be ringed in blue). Head to that area.
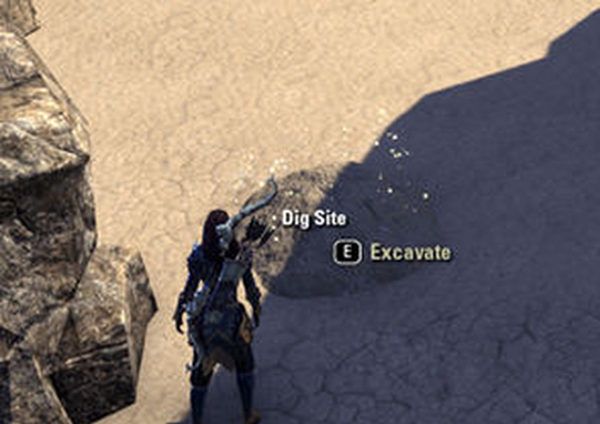
Once you are in the area, you will need to find the Dig Site itself. A few things to remember about Dig Site locations. Dig Sites will be in a relatively flat spot away from agro range of any local mobs.
Sometimes, the area can be quite large, so this is where the Antiquarian’s Eye you received from Verita Numida comes in handy. Make sure that you slot the Antiquarian’s Eye you received in Solitude in your Quick Slots. Once you enter the Antiquity zone, activate the eye. The eye will spawn a comet like mote (sometimes you will have to turn your character around to see it). There will be a tail coming of the mote. The Dig Site will be in the direction that the tail is pointing. (The Eye has a cool down timer of 30 seconds, so you’ll have to wait a bit to try again).
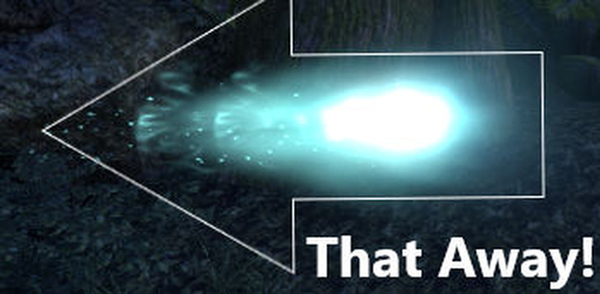
It can’t be stressed enough how important this tool is to your overall leveling efficiency. The dig sites themselves can be very difficult to spot, so being pointed in the correct location is very helpful – especially in large Antiquity zones.
You found the Dig Site! Now it’s time to Excavate.
DIFFICULTY LEVELS
Green (simple) and Blue (intermediate) leads are the easiest due to the depth of dirt and the absence of Fissures. Dirt is up to 4 layers thick and you have up to 8 chances to use the Augur. The antiquity may be a burlap sack shaped like a 5 square box or a 3×2 rectangular box. There is the chance to find 1 or 2 pieces of bonus loot. Green Dig Sites will grant a Blue Lead. Blue Dig Sites will grant a Purple Lead.
If you have leveled up your shovel and trowels skills you risk damaging the antiquity by digging too far down. If you dig past the lowest level of dirt, the screen will shake and you will damage the encasement of the antiquity. On Green and Blue difficulties, the antiquity will break if it is damaged more than 6 times. If you break the antiquity, you will have to search the area for a new Dig Site and begin again.
Purple (advanced) level Dig Sites will have up to 7 layers of dirt and rock and 7 charges of the Augur. A Rank I Augur can not penetrate all 7 layers of dirt, so you will have to clear a level of dirt with the Hand Brush before you use the Augur on that spot, or you will have to rank up your Augur to Rank II. The Antiquity will take up a 2×3 or a 2×4 rectangle and there will also be the chance for up to 3 pieces of bonus loot. If the encasement of the antiquity is damage more than 4 times, it will break and you will have to begin again at a new Dig Site.
- Advanced level Dig Site also bring in the Fissure mechanic. Fissures will explode, damaging the antiquity encasement if they are not dealt with properly. Thankfully, an antiquity will never be directly underneath a Fissure. Advanced Dig Sites have up to 6 randomly arranged (except as noted regarding placement of the antiquity) fissures. Look to the Advanced Excavating Techniques section to learn how to use Fissures to your advantage.
Gold (master) difficulty Dig Sites have up to 8 layers of dirt and rock, usually 8 Fissures, and allow you 6 uses of the Augur. A Rank II Augur can not penetrate the highest level of rock in Master Dig Sites. It is usually easiest to attempt your Auguring where the level of the rock is not at the maximum.
- The antiquity is typically aligned in a diagonal fashion on Master level Dig Sites, meaning that it will require 8 squares to be cleared before it will be fully revealed. Damaging the antiquity more than 2 times will cause it to break and you can find up to 4 pieces of bonus loot.
Orange (ultimate) difficulty Leads require Rank 10 of Scrying to be able to use and are reserved for legendary quality furnishings. If you are not interested in the housing portion of the game then it may not be necessary for you to max out the Scrying skill line.
- Dirt can be as much as 9 layers deep and you only get 5 uses of the Augur. Again, Rank II Augur can not penetrate all 9 layers so you will have to limit yourself to using the Augur on areas that are not at the highest level already, or you will have to dig down as much as 3 layers to get to a place that the Augur is capable of penetrating. Like Master difficulty Dig Sites, damaging the antiquity’s encasement 2 times will cause it to break, forcing you to start again at another Dig Site.

You will find more Fissures here than in the Master difficulty and they have a blast radius of one square surrounding the Fissure, causing them to be much more dangerous to your antiquity. Handle these Fissures with care.

TOOLS
This is a Dig Site where the Antiquity and a bonus loot has already been uncovered.
- At the top of the screen (enclosed in the purple box for emphasis) is the amount of “time” you have left. Time, in this case, is based on how many turns you have. For all difficulties, you have 40 turns (actions) to find your antiquity. If you rank up the Excavator’s Reserve passive, you will get 45 turns at Rank I and 50 turns at Rank II.
- On the right side of the picture, highlighted with a green box, is your Intuition meter. You begin with 2 possible Intuition points. If you put a skill point to rank Hand Brush up to Rank II, you will have a maximum of 4 Intuition. Intuition is needed to use the Trowel and the Heavy Shovel (blue square outline and yellow square outline respectively.)
- The small plume of smoke within the orange circle in the graphic above highlights one of the Fissures in this map. We will talk about fissures more below.
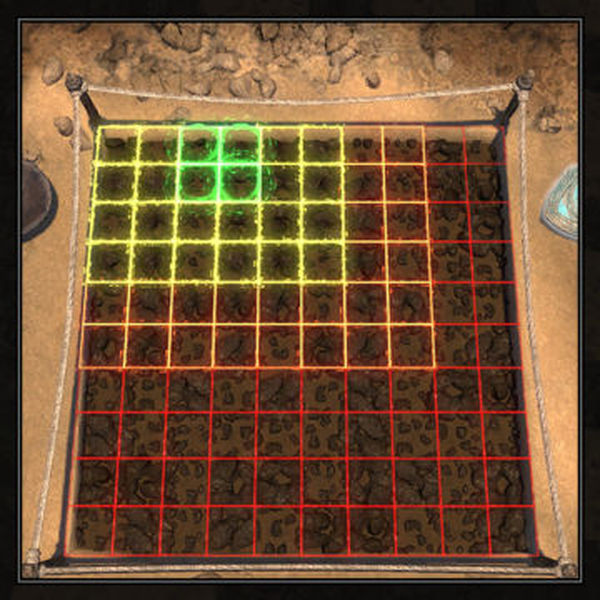
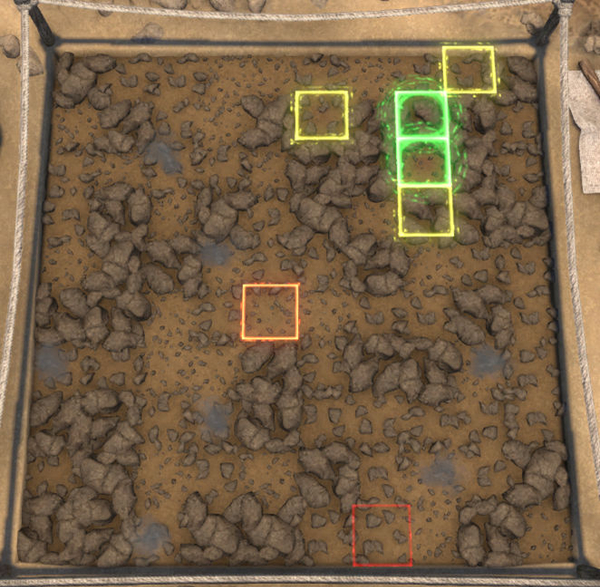
AUGURS are highlighted in the graphic by the red box, this tool is used to locate the antiquity under the dirt and rocks. A red square means that the antiquity is far away from the square you selected with the tool. An orange square is closer, a yellow square closer still, and a green square means you are directly on top of it.
- RED — The antiquity is at least 5 squares away.
- ORANGE —The antiquity is 3 to 4 squares away.
- YELLOW —The antiquity is 1 to 2 squares away.
- GREEN —The antiquity is directly beneath the square.
Antiquities tend to be 3×2 squares in shape and will never contain a Fissure (more on Fissures later).
- Hand Brush: Removes a single layer of dirt from the selected square. The brush is also used to generate Intuition (highlighted in the picture above with the green square).
- Trowel: At Rank I, removes 3 layers of dirt or rock from a 1×1 area and costs 2 Intuition to use. At Rank II, removes 3 layers of dirt or rock from a 1×1 area and costs 2 Intuition to use. The Trowel can be used to safely trigger Fissures to create explosive chain reactions. Best done after the Antiquity is uncovered and is used as an advanced way to help find bonus loot. See below for more information on how to cause chain reactions.
- Heavy Shovel: Used to remove 1 layer of dirt and rocks from up to a 3×3 area. The shovel only affects a single contiguous height of dirt and rocks, so it is often necessary to clear the 3×3 area down to an even level using the Hand Brush. Since using the Shovel costs at least 2 Intuition to use, evening out the area with the hand brush will generate the intuition needed to use the tool. At Rank II the Shovel has a chance to not consume any Intuition at all, giving you a free usage of the tool. If you have 4 Intuition available, using the Shovel will cause it to remove 2 layers of dirt from area. This can make things go quicker while excavating, but also risks breaking the antiquity if it is used while only 1 layer of dirt above the antiquity is.
- The shaded blue square in the above picture highlights the 3×3 grid affected by the Shovel. You will notice in this particular instance that not all of the layers of dirt are even. The shovel will not affect those 2 squares of dirt in the upper left corner of the highlighted area since they are not contiguous with the rest of the dirt. If you would like to clear the entire area, use the Hand Brush to clear them down to the same level as the rest.
FISSURES are found in Advanced and higher-level difficulties. While you will never find an antiquity directly below a Fissure, a controlled detonation of Fissures can be used to reveal bonus loot.
Fissures can be used to clear a line of dirt stretching from one Fissure to another (or multiple others).
In order to connect Fissures, the following requirements must be met:
- The Trowel Skill must be at Rank II.
- The Intuition Meter must be filled to Maximum (4).
- The line of dirt connecting the Fissures must all be at the same level.
Below is graphic showing a chain reaction line ready to be activated. It will show up as a dark blue shaded area. If the area is shaded light blue, then not all the requirements have been met.

* While attempting this technique, do not create a chain reaction that crosses over the antiquity. You will break the antiquity and have to start again at another Dig Site. It is always safest to do this technique AFTER the Antiquity has been revealed.
LEVELING TIPS
You will need to get a total of 700 experience points in the Scrying and Excavation skill lines in order to level them to 10. Not all players need to get to Level 10, especially if you aren’t interested in Legendary Furnishings, which can be found at Ultimate quality Leads.
You can scry on one character and excavate on the character you are leveling up, Once a lead is scried it is put in a queue as “in process”. You can have up to 5 leads “in process” before you need to excavate the leads. Once a lead is “in process” it will not expire so if you have a lead expiring it can be scried and held till ready to excavate at a later date. The character that excavates the lead will gain the experience from both scrying the lead and excavating it. Finally, you can excavate any lead no matter your level (it just will be more difficult the lower level you are because of perks).
| Level | Experience Points Needed |
|---|---|
| 1-2 | 8 |
| 2-3 | 12 |
| 3-4 | 30 |
| 5-6 | 60 |
| 6-7 | 85 |
| 7-8 | 115 |
| 8-9 | 150 |
| 9-10 | 200 |
For each lead you successfully scry and excavate, you receive a specific number of experience points to the Skill line based on the difficulty of the Lead.
| Lead Quality | Experience Points Gained |
|---|---|
| Green | 1 |
| Blue | 3 |
| Purple | 6 |
| Gold | 10 |
| Orange | 10 |
As you can see, this can be quite tedious and time consuming. Never fear, there are a few tips that can make it go quicker and smoother. If your intent is to grind Antiquities in a single afternoon, make sure you have enough Skill Points available to rank up all of the skills you want to use.
Levels 1 to 3
Artaeum is the easiest place to level from 1 to 3 in both Scrying and Excavating. That’s because it is a very small area and that means less running around. You will automatically be given a green lead for all zones, including this one, when you start the Antiquities skill lines. You can repeat the free green lead as many times as you want, or need, to get to Level 3 (you will need to Scry for, and Excavate, 20 green leads to get to Level 3). Once you get to Level 3 you can put a skill point into Antiquarian’s Eye.
Levels 3 to 5
At Rank II you will be able to Scry for, and Excavate, Blue leads. You will have obtained a free Blue Lead from the first Green Lead you excavated in the zone. You can go Scry and Excavate that lead (which will grant you a Purple Lead for the zone that you will not be able to use until you rank up Antiquarian’s Insight further). Once you use the Blue Lead, it will go away, so just use the zone’s Green Lead again. Upon successful completion of that Green Lead, you will get another free Blue Lead. Rinse – Repeat. This is still best completed in Artaeum because it is more efficient, but this can really be done in any zone you like.
Levels 5 to 7
Now that you have put enough Skill Points into Antiquarian’s Insight to get it to Rank III you are able to do Purple Leads. Go ahead and do the Purple Lead there in Artaeum. The only problem here is that, while you will get infinite Green and Blue leads through this farming process, you will only get one Purple lead this way. The only reason we have stuck with Araeum through this process is that it is small enough for efficiency, but now, it has worn out its welcome. This same process – Free Green Lead -> Free Blue Lead -> one Free Purple Lead is available in all of the zones in the game. Start traveling to the other zones and repeating the process until you get to Level 7 and can get Rank IV of Antiquarian’s Insight.
Levels 7 – 10
Once you hit Rank IV of Antiquarian’s Insight you are able to utilize and Gold Quality leads you’ve obtained. You get 10 experience points per Gold Lead completed, but some Gold Leads are not as accessible as others. Enter Cold Harbour.
Cold Harbour has a Gold Lead called the Anomalous Crystal. This can be found by picking alchemy plants anywhere in Cold Harbour. You will get the Gold Lead after only a few plants picked (I got a Gold Lead at least 20% of the time!) Scry the Lead, Excavate the Anomalous Crystal, pick a flower, repeat ad nauseum until you reach whatever level you are looking for. While level 10 is really only necessary for people who want to get the Legendary Furnishings, Level 9 Excavation allows you to get Rank II of Keen Eye: Treasure Chests. This will make you the most beloved person in your dungeon group as you are able to see treasure chests from 30m away.
HELPFUL LINKS
The Ebon Wolf Mount Location List
https://en.uesp.net/wiki/Online:Ebon_Dwarven_Wolf
Mythic Item Leads
https://eso-sets.com/sets/type/mythic
Full list of Antiquity Leads with Pictures
https://lovelynorth.com/antiquity-leads/